Wired for Success: Craftsman Riding Lawn Mower Wiring Diagram Explained
Wired for Success: Craftsman Riding Lawn Mower Wiring Diagram Explained
Attention all lawn enthusiasts, DIYers, and craftspeople! If you own a Craftsman riding lawn mower, then you know the importance of having a well-maintained electrical system. A strong and reliable wiring diagram is essential to ensure your mower functions smoothly and efficiently. In this comprehensive article, we will explore the ins and outs of the Craftsman riding lawn mower wiring diagram, uncovering its hidden secrets and revealing how it can transform the way you tackle your lawn care tasks.
As you gaze upon the intricate wiring diagram, you might be overwhelmed by the various lines, symbols, and connections. Fear not, for we are here to unravel the mysteries and guide you through this electrifying journey. Let's dive right in!
Grabbing Your Interest: Decoding the Craftsman Riding Lawn Mower Wiring Diagram
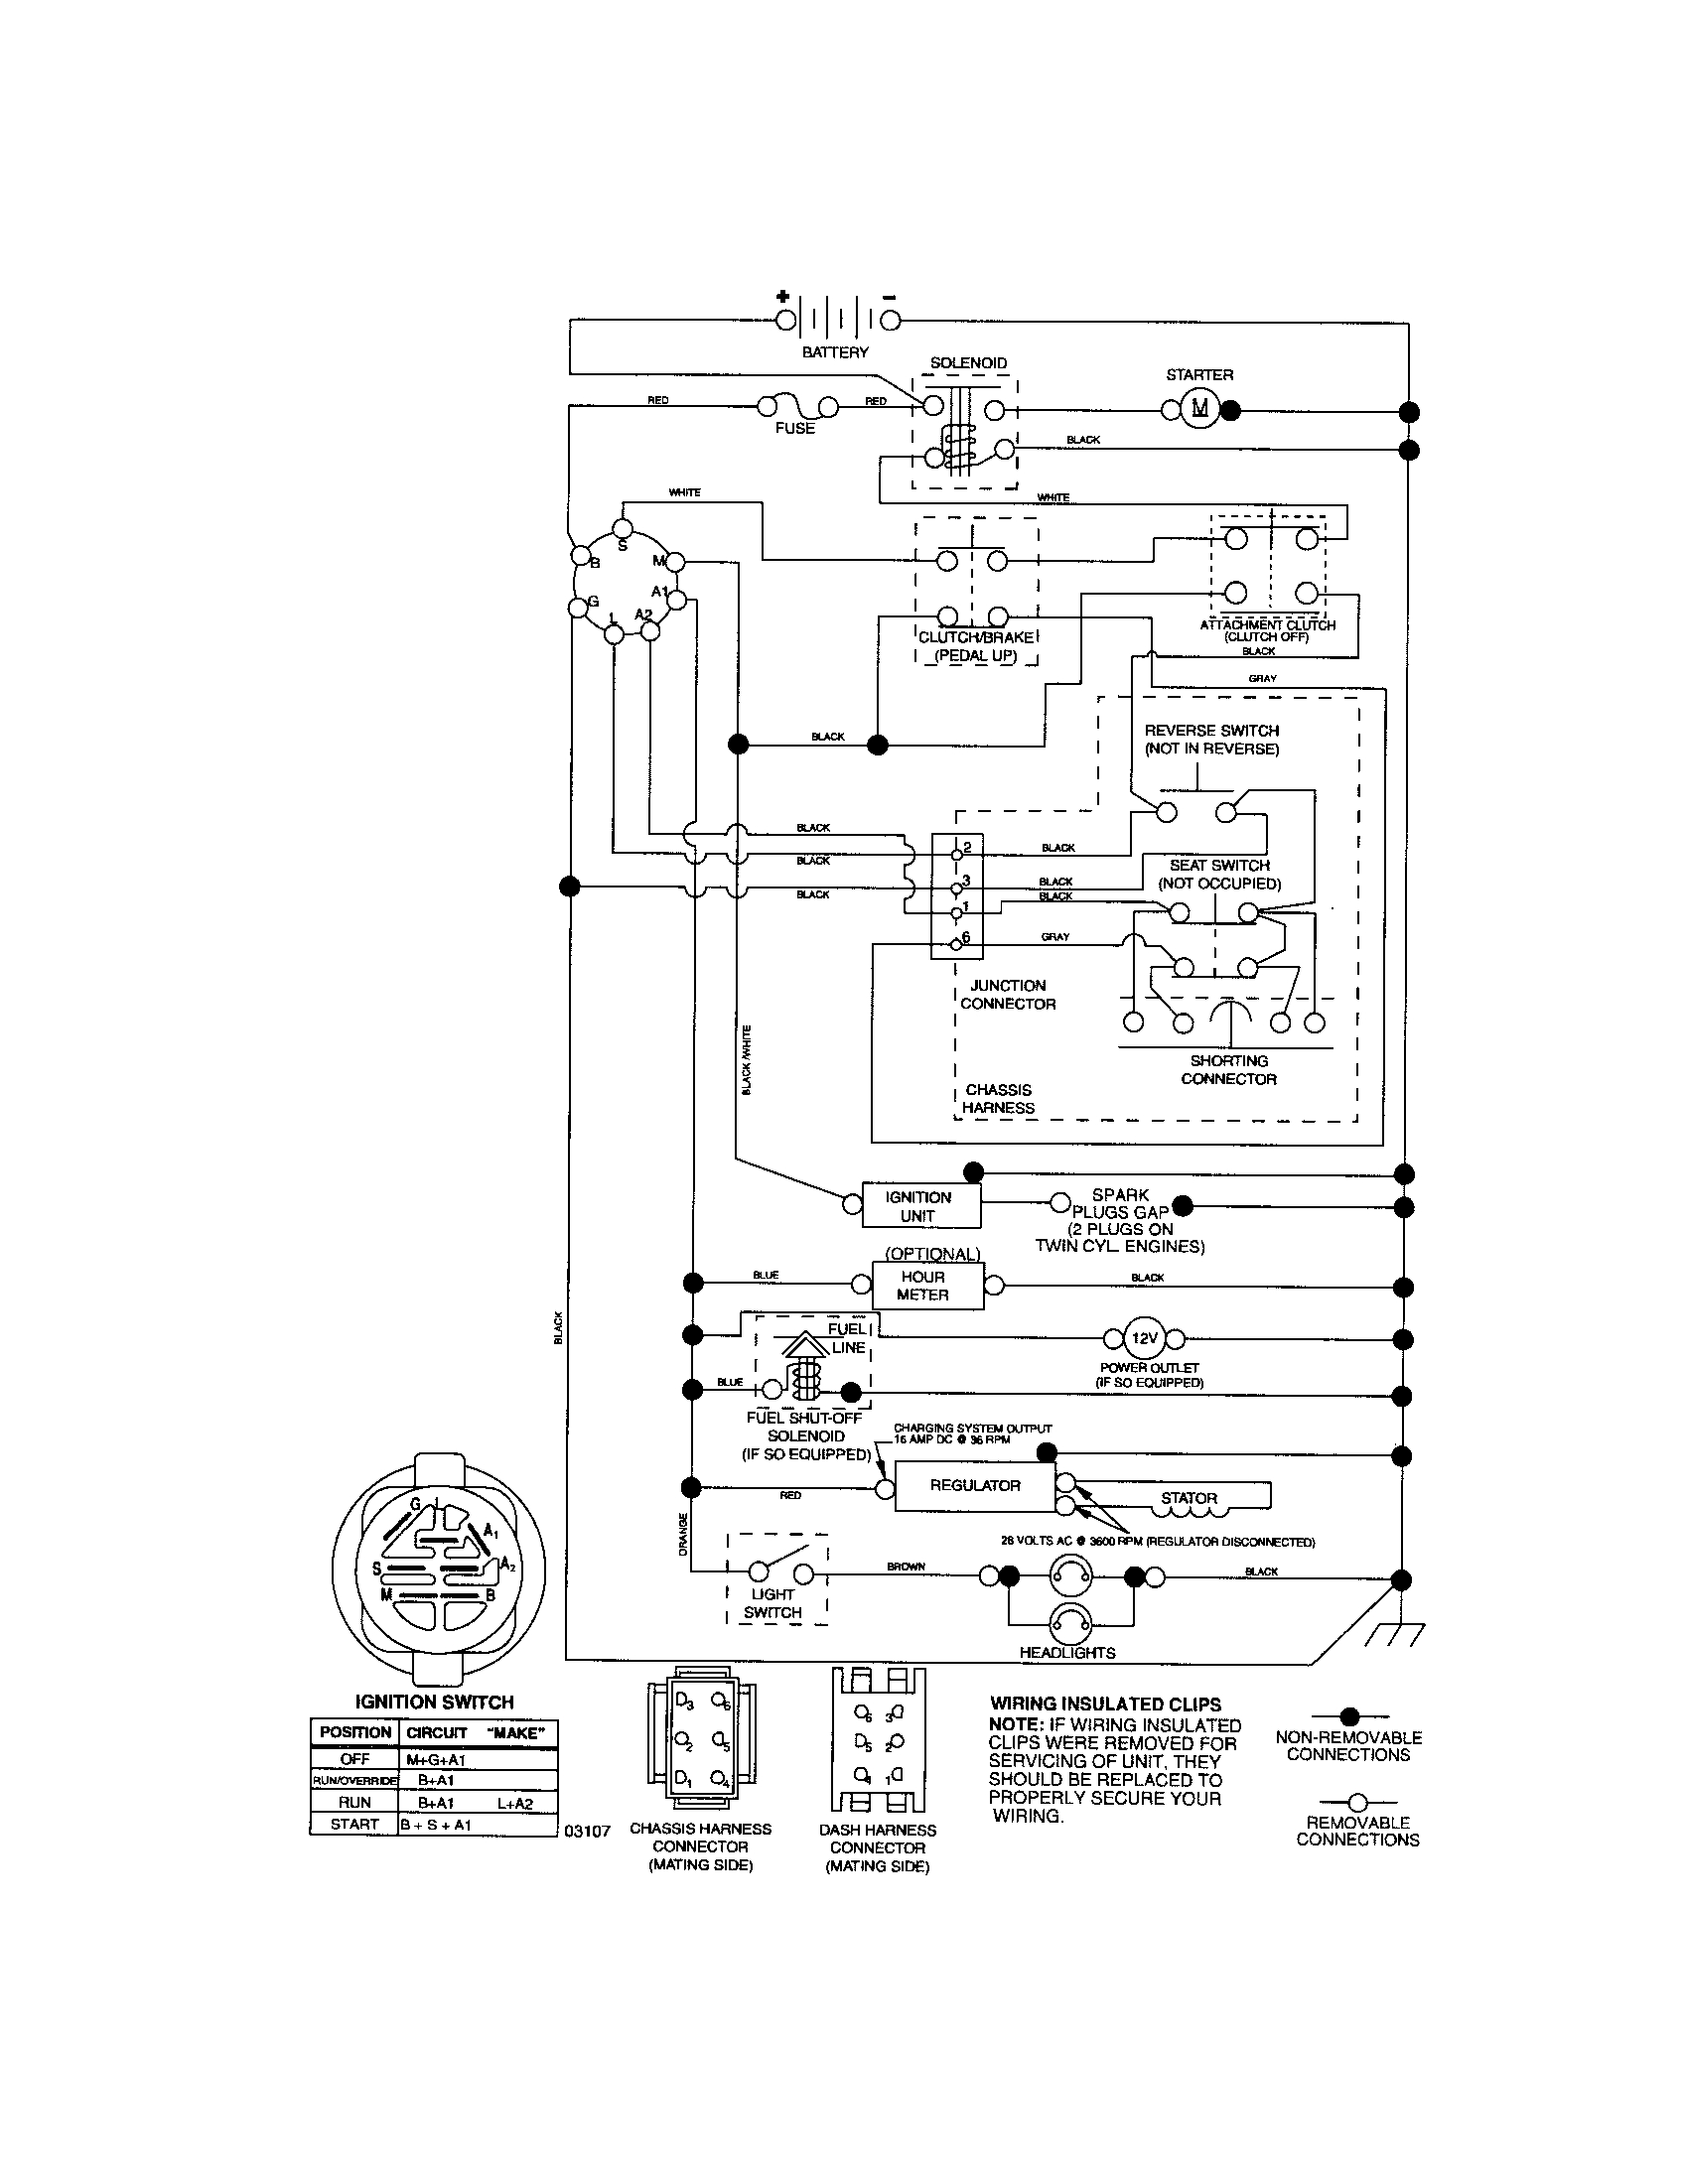
Before we delve into the nitty-gritty of the Craftsman riding lawn mower wiring diagram, let's first understand its purpose. This diagram acts as a visual representation of the electrical system in your lawn mower, providing a roadmap for the electricity to flow seamlessly.
Imagine the wiring diagram as a treasure map that leads you to a chest full of gardening possibilities. Each line, symbol, and connection holds the key to unlocking the potential of your Craftsman riding lawn mower. With this valuable tool, you can troubleshoot issues, make repairs, and even customize your mower to suit your specific needs.
The Craftsman riding lawn mower wiring diagram is ingeniously designed to enhance the performance and reliability of your machine. By following its intricate pathways, you can unleash the true power within your mower and elevate your lawn care experience to new heights.
Building Desire: Unleashing the Power of the Craftsman Riding Lawn Mower
Now that we have captured your attention and piqued your interest, let's explore the transformative abilities of the Craftsman riding lawn mower wiring diagram. This magical document holds the key to optimizing the capabilities of your beloved machine.
With the knowledge gained from the wiring diagram, you can perform a multitude of tasks that were once out of reach. Do you want to add custom lights to your mower for those late-night mowing sessions? Are you dreaming of installing a convenient electric start system to save time and effort? The Craftsman riding lawn mower wiring diagram empowers you to bring these desires to fruition.
Understanding the intricacies of the wiring diagram allows you to diagnose and troubleshoot any electrical issues that may arise. No longer will you be at the mercy of expensive repairs and time-consuming delays. Armed with this knowledge, you can easily identify and fix any potential problems, ensuring that your Craftsman riding lawn mower is always in pristine working condition.
Moreover, the wiring diagram opens up a world of possibilities for customization. Want to add a power outlet to charge your phone while mowing? Perhaps you envision integrating a Bluetooth speaker system to enhance your mowing experience. The Craftsman riding lawn mower wiring diagram provides the blueprint for turning these dreams into reality.
Taking Action: Mastering the Craftsman Riding Lawn Mower Wiring Diagram
Now that you are fully convinced of the value the wiring diagram brings to the table, it's time to take action and become the master of your Craftsman riding lawn mower's electrical system. Here are a few steps to get you started:
1. Study the Diagram
Dedicate some time to thoroughly examine the wiring diagram. Familiarize yourself with the different components, connections, and symbols. By understanding the layout of the diagram, you will be better equipped to troubleshoot and make modifications.
2. Identify Key Components
Pay close attention to the key components mentioned in the wiring diagram, such as the ignition switch, starter solenoid, and various safety switches. Understanding how these elements interact with one another is crucial in interpreting the diagram correctly.
3. Take Precautions
Remember, when working with electricity, safety should always be a top priority. Before attempting any electrical work on your Craftsman riding lawn mower, make sure to disconnect the battery and wear appropriate protective gear.
4. Seek Professional Help, if Needed
If you find yourself overwhelmed or uncomfortable with certain electrical tasks, don't hesitate to seek assistance from a professional. They can offer guidance and ensure that the wiring is done correctly and safely.
By following these steps, you will soon gain a deep understanding of the Craftsman riding lawn mower wiring diagram, enabling you to tap into its remarkable potential.
Final Thoughts
Now that we have explored the world of the Craftsman riding lawn mower wiring diagram, you are armed with the knowledge and excitement needed to take your lawn care experience to new heights. This intricate diagram holds the key to unlocking the true power and customization possibilities of your trusty mower.
Remember, the journey might seem intimidating at first, with its complex lines and symbols, but don't let that deter you. Embrace the challenge and embark on the electrifying path towards a beautifully manicured lawn.
So go ahead, grab your toolbox, and let the Craftsman riding lawn mower wiring diagram be your guiding light. Discover the joys of a well-maintained electrical system and watch as your lawn transforms into a masterpiece.
Post a Comment for "Wired for Success: Craftsman Riding Lawn Mower Wiring Diagram Explained"