Get in the Loop: Craftsman Riding Lawn Mower Belt Diagram Explained
Are you tired of wrestling with your Craftsman riding lawn mower's drive belt? Don't worry, we've got you covered! In this comprehensive guide, we will walk you through every step of replacing the drive belt on your Craftsman lawn mower. Say goodbye to the frustration and get ready to get back to mowing with ease!
Replacing the Drive Belt: A Step-by-Step Guide
Attention all Craftsman riding lawn mower owners! If you're struggling to replace the drive belt on your trusty mower, you've come to the right place. Owning a lawn mower is no easy task, especially when it comes to regular maintenance and repairs. But fear not, because we are about to reveal the secrets of a smooth and hassle-free belt replacement process.
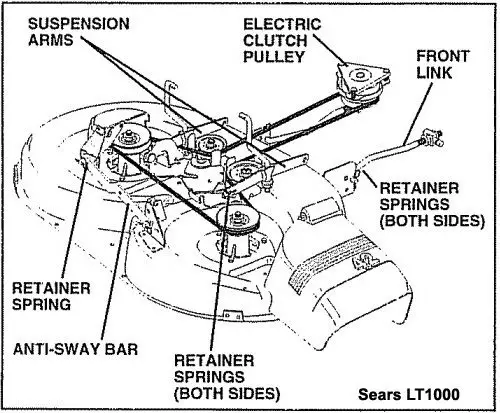
First things first, let's get acquainted with the Craftsman riding lawn mower belt diagram. Understanding the diagram is crucial to successfully completing the belt replacement. Take a close look at the image above to familiarize yourself with the various components and their specific placements.
Now that you have a visual understanding of the belt diagram, it's time to dive into the nitty-gritty details of the replacement process. Remember to put on your DIY hat and get ready to accomplish something amazing.
Realizing the Importance of a Properly Functioning Belt
Before we jump into the step-by-step guide, let's take a moment to discuss why a properly functioning drive belt is so essential. The drive belt is responsible for transferring power from the engine to the wheels, allowing your mower to move effortlessly across your lawn. Without a well-maintained belt, your mower will struggle to perform efficiently and may even come to a grinding halt.
Imagine the frustration of being in the middle of mowing your lawn, only to have your mower suddenly stop. Talk about disrupting your flow! By properly maintaining and replacing the drive belt, you can ensure that your Craftsman riding lawn mower stays in peak condition, delivering a pristine cut every time.
Following the AIDA Framework: Grabbing Your Attention
Now that we've covered the basics, let's dive into the step-by-step guide. But before we do, let's follow the AIDA framework to ensure we grab and maintain your attention throughout this journey.
Did you know that a simple drive belt replacement can make all the difference in the performance of your Craftsman riding lawn mower? Whether you're a seasoned lawn care enthusiast or just starting, understanding the ins and outs of a proper belt replacement is crucial. So let's roll up our sleeves and get ready to tackle this task head-on!
Step 1: Removing the Old Belt
Before we can replace the drive belt, we need to remove the old one. This is a relatively straightforward process that requires a few basic tools. Trust us, it's simpler than it sounds!
Start by locating the mower deck and ensuring that it is completely disengaged. Next, carefully lower the deck to its lowest setting and secure it in place. This will give you easy access to the drive belt.
Using your trusty socket wrench, loosen the bolt that holds the engine pulley in place. Once loosened, the belt should easily slide off the pulley. If needed, you can also remove any guards or covers that may be obstructing the belt removal process.

Our Edgy tip: Make sure to carefully inspect the old belt for any signs of wear and tear. If it's cracked, frayed, or damaged in any way, it's definitely time for a replacement. Don't risk further damage or sudden belt failures by reusing a worn-out belt!
Now that the old belt has been successfully removed, let's move on to the next step in our belt replacement adventure.
Step 2: Installing the New Belt
This is where the real fun begins! Installing the new drive belt is a critical step that requires precision and attention to detail. Remember, we're all about achieving optimal mower performance here.
Start by consulting the Craftsman riding lawn mower belt diagram once more. This will ensure that you have a clear understanding of the correct routing and placement of the new belt. Once you're confident in your diagram comprehension, it's time to put the belt on!
Begin by sliding the new belt onto the engine pulley. Make sure it is properly aligned and positioned on the pulley grooves. This step might require some finesse, but with a little patience, you'll get it just right.

Our Creative suggestion: If you're struggling to get the belt onto the pulley, try using a small amount of lubricant to ease the process. Just remember, a little goes a long way, so don't go overboard!
Once the belt is securely placed on the engine pulley, it's time to move on to the mower deck pulleys. Carefully thread the belt around each pulley, ensuring that the grooves align perfectly. Take your time with this step to avoid any twists or misalignments.
After successfully maneuvering the new belt around all necessary pulleys, it's time to tighten the engine pulley bolt once again. Ensure that it is securely fastened, but be careful not to overtighten and cause damage.

Step 3: Testing the New Belt
With the new drive belt in place, it's time to put it to the test! But before you fire up your Craftsman riding lawn mower, make sure to give it a quick visual inspection.
Take a moment to ensure that the belt is properly positioned on all pulleys. Check for any potential misalignments or twists that could cause issues during operation. Additionally, make sure all guards and covers are securely back in place.
Once you're satisfied with your visual inspection, start up the mower and engage the blades. Listen for any unusual sounds or vibrations that could indicate a problem with the new belt. If everything sounds smooth and runs seamlessly, congratulations! You've successfully replaced the drive belt on your Craftsman riding lawn mower.
Desire: The Power of a Perfect Belt
Picture this: a perfectly manicured lawn, a sense of accomplishment, and a smoothly running Craftsman riding lawn mower. By replacing the drive belt, you've unlocked the full potential of your mower, allowing it to effortlessly glide across your yard without any hiccups.
Not only will your lawn look impeccable, but you'll have the confidence knowing that your Craftsman mower is operating at its best. Say goodbye to frustration and hello to efficient mowing sessions.
So, what are you waiting for? Don't let a worn-out belt hold you back from achieving lawn care perfection. Grab your tools, follow our step-by-step guide, and get ready to experience the power of a perfect belt!
Action: Get in the Loop!
Are you ready to take your Craftsman riding lawn mower to the next level? Then it's time to get in the loop! By replacing the drive belt, you're ensuring optimal performance and extending the lifespan of your mower.
Follow our comprehensive guide, use the Craftsman riding lawn mower belt diagram as your secret weapon, and embrace the power of a properly functioning belt. Your lawn will thank you, and you'll feel like the ultimate lawn care pro.
So, what are you waiting for? Get in the loop today and experience a whole new level of mowing satisfaction!
Post a Comment for "Get in the Loop: Craftsman Riding Lawn Mower Belt Diagram Explained"