Wiring Mastery: Understanding the Murray Riding Lawn Mower Wiring Diagram
Understanding the Murray Riding Lawn Mower Wiring Diagram
Attention all lawn enthusiasts and DIY experts! Have you ever found yourself perplexed by the intricate wiring system of your Murray riding lawn mower? Fear not, for today, we are diving deep into the realm of wiring mastery and unraveling the secrets hidden within the Murray riding lawn mower wiring diagram. Prepare to be enlightened!
Before we embark on this thrilling journey, let's take a moment to appreciate the sheer brilliance and complexity behind the design of a Murray riding lawn mower. These magnificent machines boast a myriad of intricate wiring connections, each serving a vital purpose in ensuring smooth operation and productivity. Behind their sleek exteriors lies a labyrinth of wires intricately woven to create a symphony of power.
Let's start our exploration by analyzing the various components depicted in this wiring diagram. To truly master the art of wiring, we must first understand the basic elements that make up this intricate system.
Key Components and Their Functions
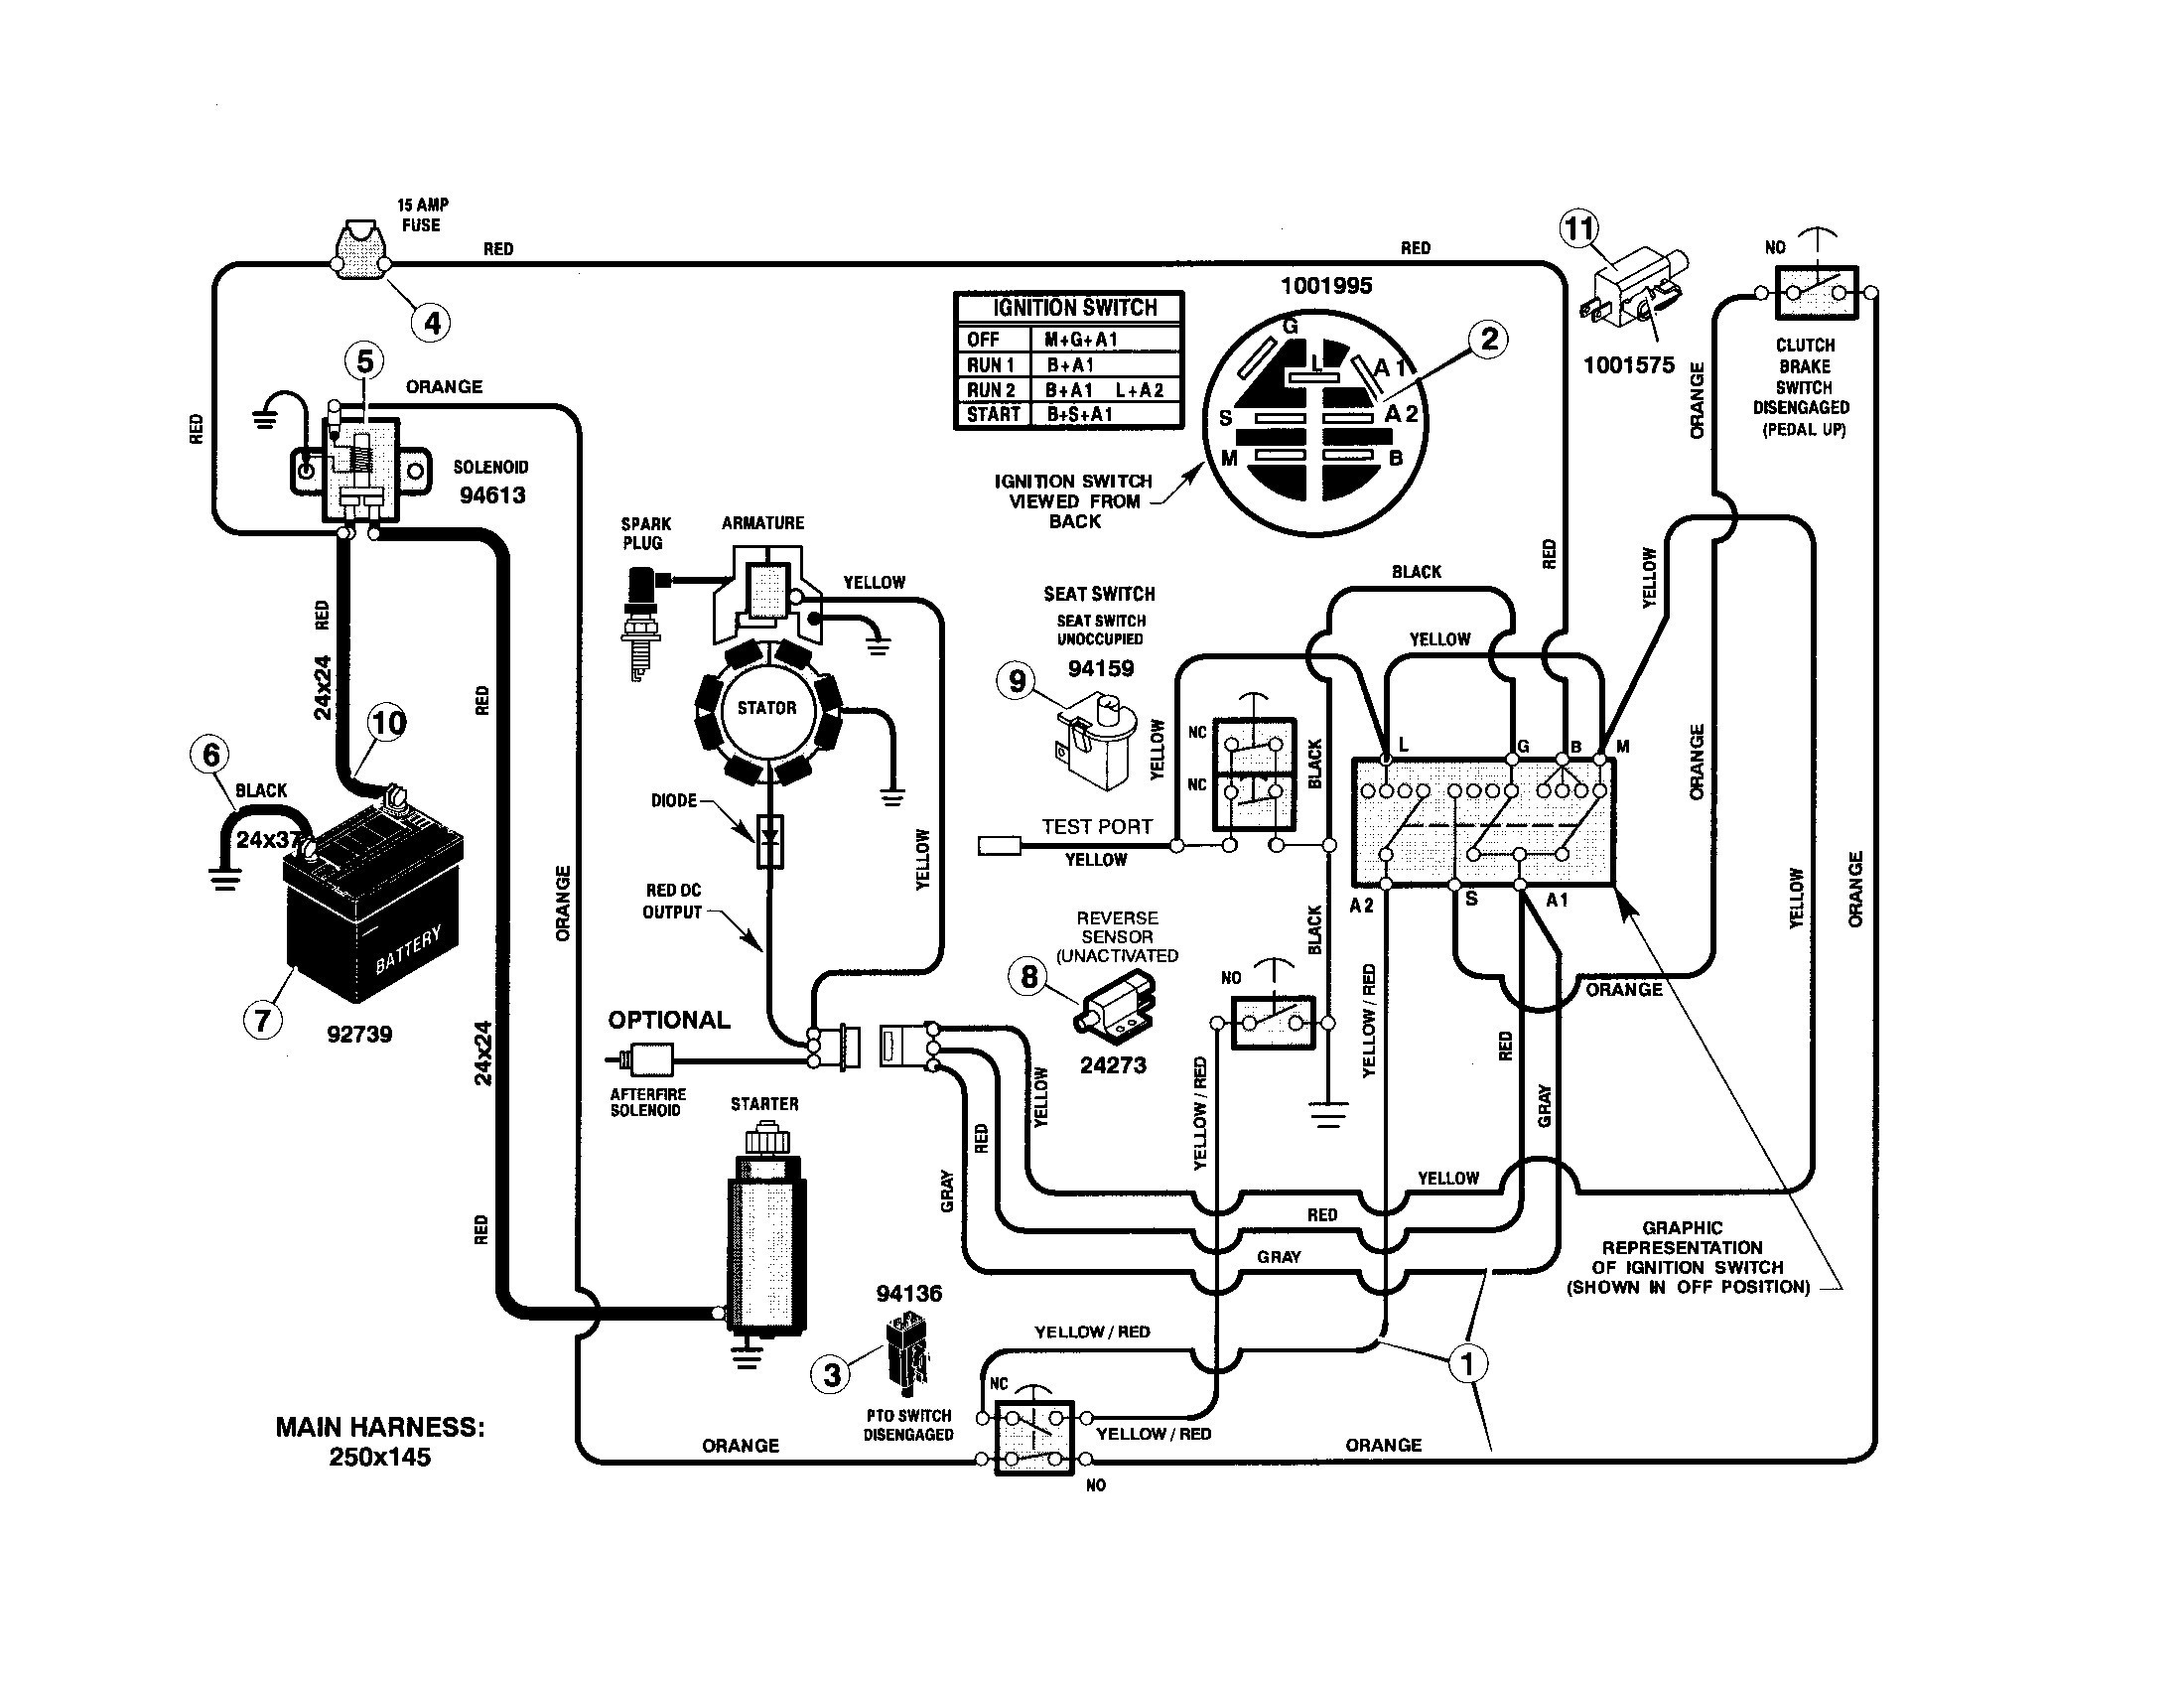
1. Ignition Switch: The ignition switch acts as the gateway, allowing power to flow through the system. It is the catalyst that kickstarts the engine and sets the wheels of your Murray riding lawn mower in motion.
2. Starter Solenoid: Serving as the intermediary between the ignition switch and the starter motor, the starter solenoid engages the motor, enabling the engine to roar to life. It is the fiery conductor of this electrical symphony.
3. Battery: A powerhouse of electrical energy, the battery provides the necessary voltage to propel your Murray riding lawn mower forward. Without a fully charged battery, the engine would remain dormant, leaving your lawn unattended and sighing in despair.
4. Safety Switches: These clever devices act as guardians, ensuring that your Murray riding lawn mower operates safely and prevents any unfortunate mishaps. From seat switches that detect the presence of the operator to blade engagement switches that prevent accidental mowing, these safety switches are the unsung heroes
5. Fuse: This small but significant component safeguards the electrical system, preventing any overloads or short circuits from wreaking havoc. Think of it as the bodyguard, shielding your Murray riding lawn mower from potential damage.
Now that we have explored some of the key components, let's delve deeper into the intriguing world of wiring connections. Brace yourselves, for this is where the real magic happens!
The Intricacies of Wiring Connections
1. Battery to Ignition Switch: This connection is the lifeline of your Murray riding lawn mower's electrical system. It allows power to flow from the battery to the ignition switch, igniting a fire within the heart of your machine. It is the spark that sets everything in motion.
2. Ignition Switch to Starter Solenoid: Picture this connection as a bridge between the ignition switch and the starter solenoid. When the ignition switch is engaged, it sends a signal to the starter solenoid, allowing a surge of energy to power the starter motor. Just like a conductor leading an orchestra, this connection orchestrates the symphony of electrical power.
3. Safety Switches to Ignition Switch: The safety switches join forces with the ignition switch, working hand in hand to ensure the smooth operation of your Murray riding lawn mower. They act as gatekeepers, granting access to power only when the necessary safety measures are met. Their diligence protects both you and your lawn from potential hazards.
4. Starter Solenoid to Voltage Regulator: This connection is responsible for regulating the voltage output, maintaining a steady flow of power to the electrical components. It acts as the guardian of stability, safeguarding your Murray riding lawn mower from any power surges or fluctuations.
5. Fuse to Electrical Components: The fuse plays a crucial role in protecting the various electrical components of your Murray riding lawn mower. Through its humble connection, it ensures that the flow of electricity remains stable and uninterrupted, preventing any damage or malfunctions.
Now that we have explored the marvelous symphony of wiring connections, let's take a moment to bask in awe at the complexity and beauty of the Murray riding lawn mower wiring diagram. A fusion of art and science, this diagram represents the culmination of human ingenuity and a testament to the wonders of modern technology.
The AIDA Framework: Captivating Your Inner Curiosity
Now that we have delved into the intricacies of the Murray riding lawn mower wiring diagram, an insatiable desire may have sparked within you. How can you use this newfound knowledge to enhance your own mastery of wiring? Fear not, for the path ahead is illuminated!
As you navigate through the labyrinth of wiring connections, allow your curiosity to guide you. Explore each component and connection methodically, understanding the purpose behind its existence. Unleash your creativity, experimenting with innovative solutions to potential wiring issues. Embrace the challenge and let your inner wiring artist flourish!
Gather the necessary tools and equip yourself with an understanding of electrical safety. Remember, with great power comes great responsibility. Ensure you take every precaution to protect yourself and your Murray riding lawn mower from harm. Safety should always be the foundation upon which your wiring mastery is built.
And now, my fellow enthusiasts, it is time to take action! Apply this newfound knowledge to your own Murray riding lawn mower. Embrace the adventure of unraveling wires, connecting components, and bringing your machine to life. Witness the fruits of your labor as your lawn transforms into a landscape of envy and admiration.
With the AIDA framework guiding us, we have embarked on a journey through the realm of wiring mastery. From capturing your attention with the wonders of the Murray riding lawn mower wiring system to fueling your interest in discovering the intricate connections, we have transported you on an electrifying adventure.
So, my friends, ignite your passion for wiring mastery and conquer the challenges that lie ahead. Embrace the edgy excitement and creative ingenuity that comes with understanding the Murray riding lawn mower wiring diagram. Become one with the symphony of power that breathes life into your beloved machine. The world of wiring mastery awaits!
Post a Comment for "Wiring Mastery: Understanding the Murray Riding Lawn Mower Wiring Diagram"